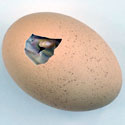
When an egg is ready to hatch — whether chicken, duck, goose, or other poultry — the baby bird inside breaks a hole through the egg’s shell. The hole is called a pip and the process of creating the hole is called pipping. The little bird pips with the help of its egg tooth—a small, sharp temporary cap at the tip of its upper beak. When you hatch eggs in your own home incubator, you can witness this miracle in progress.
From the appearance of the pip until the hatchling breaks all the way around the shell and kicks free can take anywhere from a couple of hours to more than a day. Sometimes a bird pips and then gets stuck and fails to emerge from the shell. A hatchling that is unable to get free of the shell without assistance is called a help-out. The following incubation conditions lead to help-outs:
Improper Positioning
Just prior to hatching, a bird should have its head under its right wing and be in a position to break through the air cell. A chick with its head under its left wing or between its legs cannot turn its head to break through the shell. Improper position can result from high incubation humidity, failing to keep the blunt end of the egg higher than the pointed end throughout incubation, or failing to stop turning the egg in time for the bird to reposition.
Poor Air Cell Position
When the air cell is not at the blunt end of the egg, the chick doesn’t have enough room to turn its head and break the shell all the way around. Poor air cell position can be caused by improper turning or by positioning eggs on the hatching tray with the pointed end higher than the blunt end.
Low Humidity
Hatching humidity that is too low causes the shell membrane to dry too rapidly after the bird has pipped. As a result, the shell membrane binds to the emerging bird, preventing it from moving.
Hereditary Issue
When the blunt end of an egg remains above the pointed end throughout incubation, and the temperature and humidity are properly controlled, help-outs could be a hereditary problem. In that case, birds that need help breaking free of the shell, assuming they live, will mature to produce more chicks that have difficulty hatching. For this reason — and because a help-out is likely to have crooked feet or a twisted neck that makes walking and eating difficult — assisting help-outs is not a good idea, especially if the chicks are destined to become show birds or future breeders. However, if you just can’t resist assisting a help-out, here are a few important rules to follow:
- Do not lend assistance unless a shell has been pipped. A chick that is too poorly developed or too weak to pip is not likely to survive.
- If it pips the shell but does not start cutting a circle around the shell within 12 hours, gently chip the shell from around the pip hole.
- If you see blood, stop and wait a few hours to avoid hemorrhage.
- If the shell membrane dries out (changes from translucent white to parchment tan) gently moisten it. Do not drip water into the pip, as the baby’s beak is right there and you don’t want to run the risk of drowning the bird.
- And remember, if you keep opening the incubator to see what’s going on, you contribute to the problem by reducing the humidity.
Acquiring fertile eggs and hatching them in your own incubator can be an educational and rewarding experience, but one that may also come with the heartache of seeing some chicks fail to hatch. The trick to successful help-outs is knowing when to lend a hand and when to let nature run its course.
Personally, I do all I can to ensure optimal conditions in the incubator and hatcher, and then I let nature take its course. A hatchling that is strong enough to break out of the shell on its own is more likely to grow up to become a vigorous and healthy chicken, duck, or goose.
And that’s today’s news from the Cackle Coop.
Gail Damerow is the author of Hatching and Brooding Your Own Chicks

